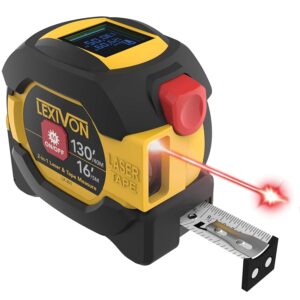
You shouldn’t be embarrassed if you don’t know how to read a tape measure. This is a skill that needs to be taught in order to truly understand how to use this tool. After you learn the few rules I show you below, you will see how quick and easy it is to read a tape measure. Keep reading to learn how to read a tape measure.
A tape measure is a tool we use to take accurate measurements of virtually any object. There are two main types of tape measures. They are known as metric, and standard tape measures. Both of these are divided into smaller segments that make it possible to get an accurate measurement. Both will do the same job, all that matters is choosing the one you are most comfortable with.
I will start off by explaining the standard tape measure, and then cover the metric tape measure later.
It is best if you use the same tape measure rather than switching between multiple ones on a project. Different tape measures may have a slight variation in the location of their marks. This difference is very minor, but it may affect your measurements if switching back and forth. Remembering this will insure you are as accurate as possible.
Before you learn how to read a tape measure, first you must learn about the tape measure itself. Let’s take a look at the parts of the tape, and get an understanding of their functions.
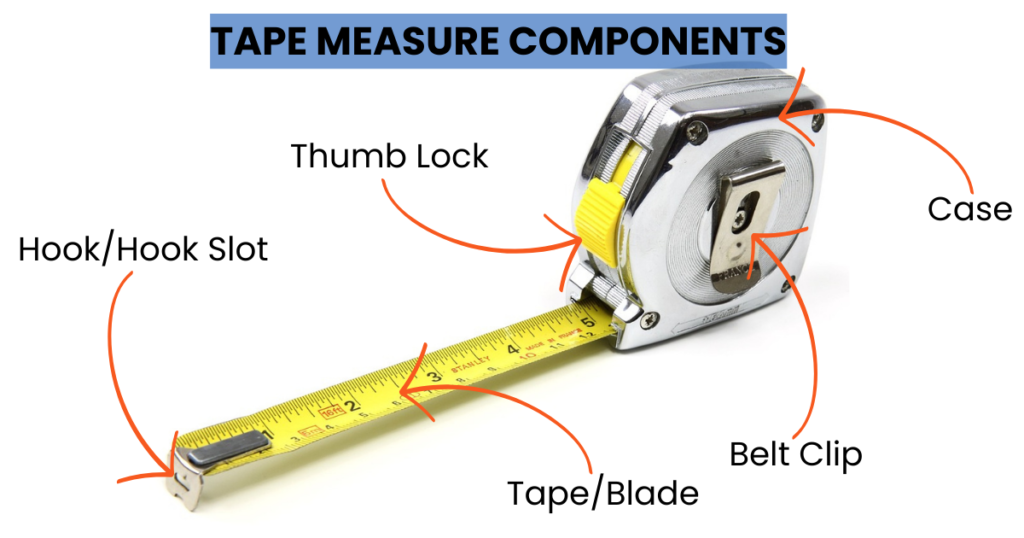
Tape Measure Componenets
- Hook – The angled metal piece at the end of the blade that hooks onto, or butts up against a surface being measured. This piece slides a small amount, making sure you are not including the thickness of the hook in your final measurement.
- Hook slot – A hollow hole on the hook that allows the hook to attach to an object like a nail or screw. This can come in handy at times when you need an extra set of hands but don’t have a helper. Tap a nail at the spot you are measuring from and hook the hook slot on.
- Tape or blade – The long part of the tape measure that retracts from the case. It has numbers and lines on it that indicate measurement lengths. It is usually a bright yellow color with black writing/marks for easy reading.
- Thumb lock – A sliding portion above the tape on the case that allows the blade to be locked in place. This can be useful when you need an extra hand to make a mark or write a measurement down.
- Belt clip – A metal clip on the side of the case that allows the tape measure to be hooked onto something like a belt or pants pocket.
- Case – This is the housing that holds all the above components together. There is a spring inside the case that allows the tape to retract when not in use.
How to Use a Tape Measure
There is a method of using a tape measure. It’s simple, and can be explained like this. Hold the tape measure in one hand with the hook at the bottom near your index finger. With your other hand you will pull out the hook and place it on one side of the item you want to measure. pull the tape measure to the other side of the item, and hold it square against the edge of what you are measuring. Take a look at the mark that is touching (or closest to) the edge you are measuring.
Start by looking at the nearest foot that is between the two edges of what is being measured. Then find the closest inch between. Next you will figure out what mark the edge is at, giving you the entire measurement. You will read the measurement in the order of feet, inches, then fractions of an inch. Let’s take a look at how to read fractions of an inch on a tape measure.
Standard Tape Measure
The standard, also known imperial tape measure is a tape that measures in inches. When you look at the tape, there are numbers that indicate inches and feet. There are also groups of lines that are several different lengths. These lines are what tell you the fractions of the inch, giving a specific and accurate measurement.
How to Read a Tape Measure in Inches
Let’s start by learning what the marks on the tape measure mean. You will notice there are a series of lines on the tape measure. The longest lines go across the tape, and have numbers next to them. These lines are the inch marks. That means whatever the number is next to that line, it is that many inches away from the hook on the tape measure.
The Lines Between Inches on a Tape Measure
Between the inch marks are shorter lines of different lengths. These lines are 1/16 of an inch increments. If you start at any one of the inch marks, and count all the lines including the next inch mark you will notice that there are 16 of them.
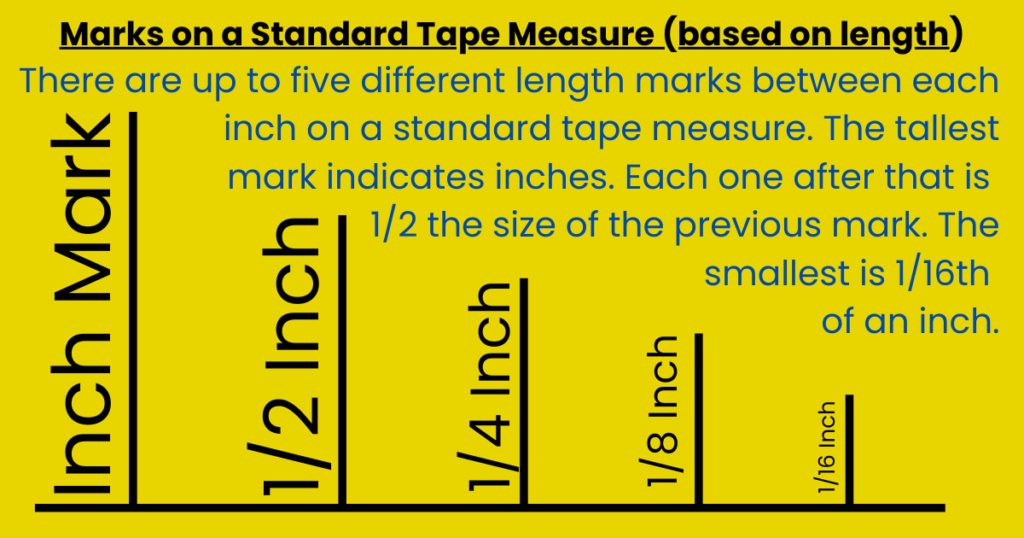

The tallest line between the inch marks is the ½ inch mark. There is one of these lines, as they indicate the halfway point between inches. The mark show in the picture here is the 1 and 1/2 inch mark.
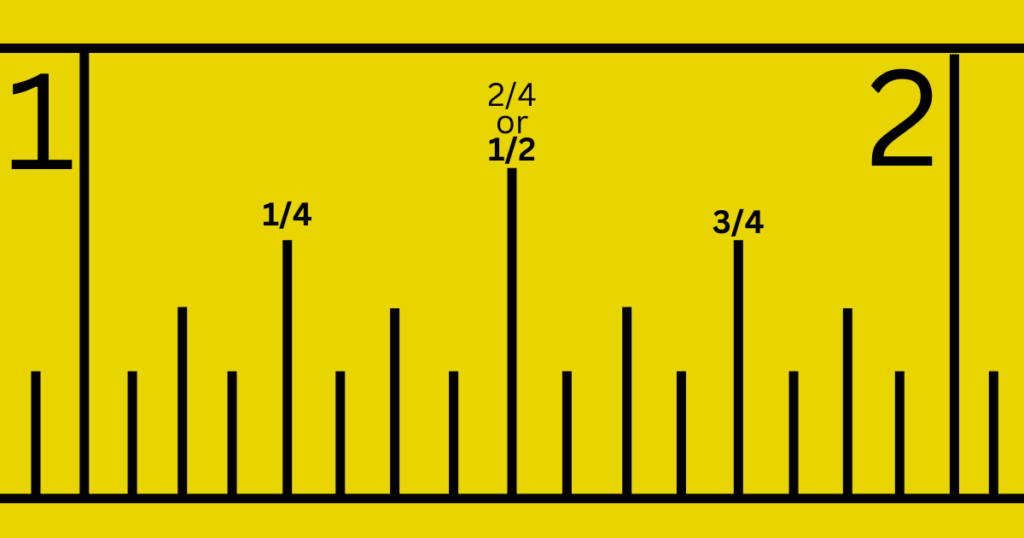
Half way between the inch marks and the ½ inch mark are the quarter inch marks. These are slightly shorter than the half inch mark. There are two of these marks at the 1/4 inch and 3/4 inch locations. The 1/2 inch mark can also be used as a 1/4 inch mark because 1/2 will translate to 2/4.
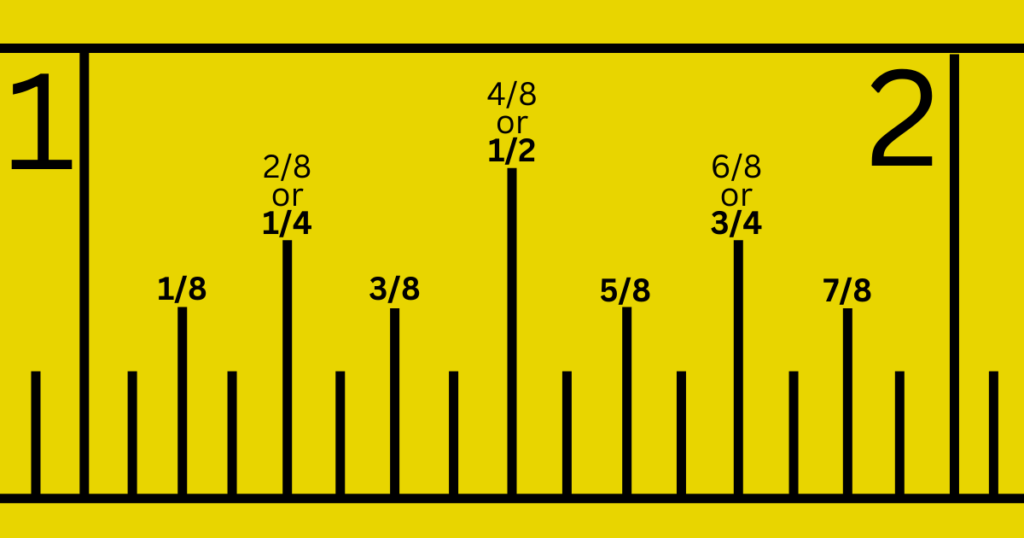
The next shorter one is the 1/8th inch mark. You will notice there are four marks at this length. They are 1/8, 3/8, 5/8, and 7/8 measurements. The 1/4, 1/2, and 3/4 do not have an 8 in the denominator because we want to read the lowest common denominator. That is true for any of the measurements we have.
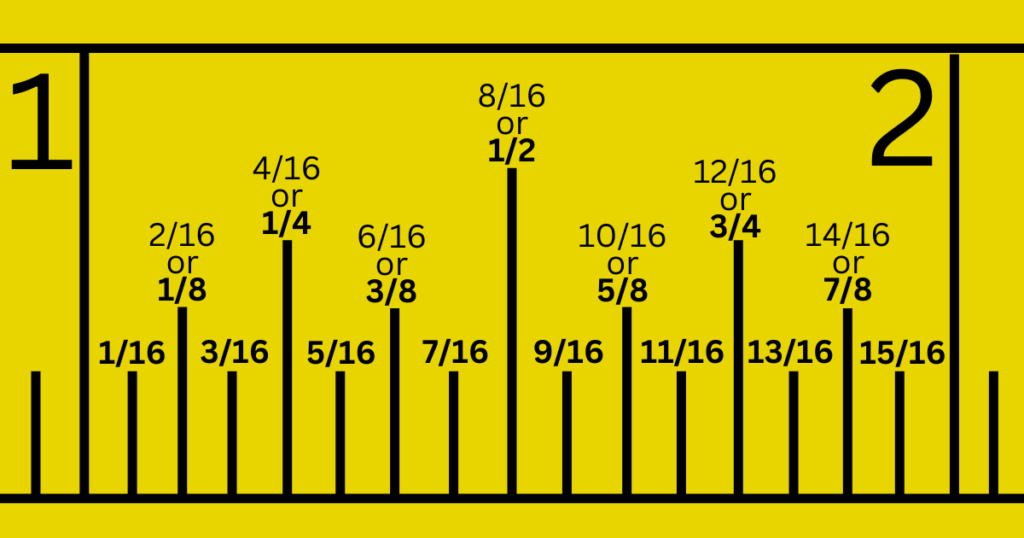
The shortest marks on most tape measures are the 1/16 marks. These are located between every other mark on the tape measure. Like the fractions above, we are only reading the odd numbered ones as having a 16 in the denominator.
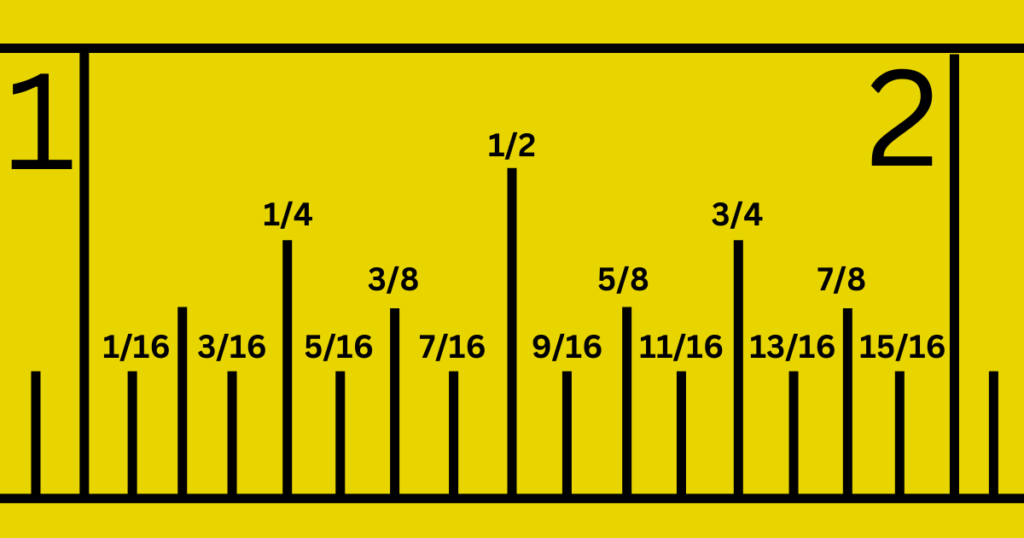
This is the way the marks between the inches read. They all are read with the lowest common denominator (the bottom number) for that fraction. You will notice the numerator (top number on the fraction) is always an odd number. That’s because if it was even, the fraction has not been reduced completely at that point.
How to Read a Metric Tape Measure
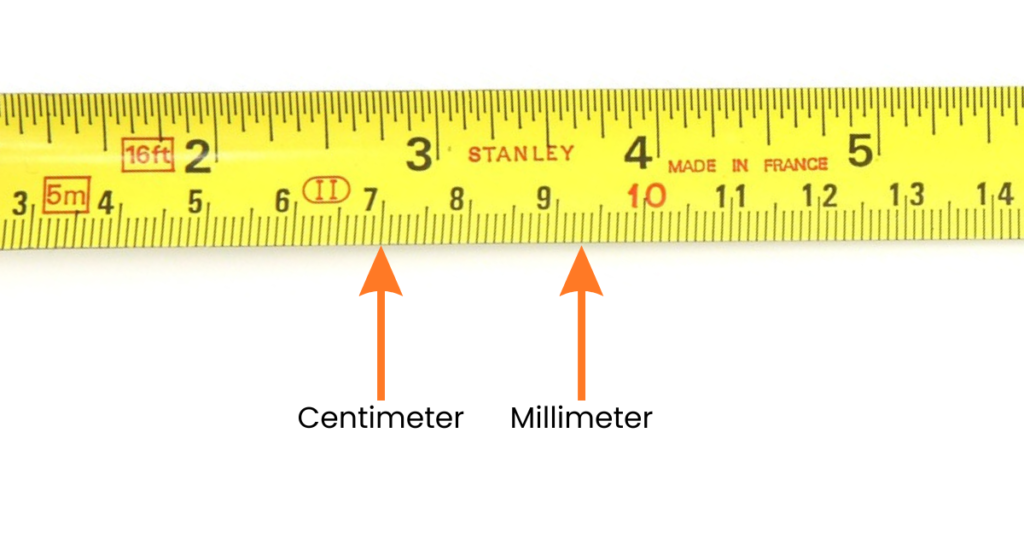
Reading a metric tape measure is similar to reading a standard tape measure. But there is one main difference. The marks between the centimeters are read in decimals rather than fractions. That is because there are ten spaces between the centimeter marks. These segments are divided into “tenths” of a centimeter.
Go about reading your measurement off the same way as a standard tape. In this case you will start with the nearest meter to the inside of what you are measuring. Meters are at the 100 centimeter marks. The tape should indicate this measurement with a 1M, 2M, etc at these locations.
Next look for the nearest centimeter to the inside of the spot you are measuring. There will be a number at this location.
Finally count how many millimeters there are From the centimeter you found to the location you are measuring. This will give you the final amount of your measurement.
Frequently Asked Questions
Does a Measuring Tape Start With Zero or One?
On a measuring tape, the hook is at the zero location. Any length beyond the hook is a fraction of an inch until you get to the one. Sometimes it’s necessary to make your measurement by holding the tape at the one. This is called burning an inch. Make sure you subtract one inch from your final measurement in this circumstance.
Is it Better to Use a Metric or Standard Tape Measure?
Deciding to use a metric or standard tape is up to you. Both of them are capable of taking measurements with great accuracy. The question is which one are you more comfortable with. If you don’t know yet, you may want to ask yourself a few questions. Will you be working with other people who have a preference? Have you learned how to read one or the other yet? What is the common unit of measurement for the country you are living in at the moment?
These questions should help you make an educated decision on which one you want to use. If you can’t decide then consider getting a tape measure that has both options. Over time you may find yourself using one the majority of the time.
What is the black diamond on a tape measure?
Some tape measures have a black diamond on them. These diamonds are used in construction, and indicate the spacing for floor joists. This diamond is a quick way for construction workers to have an accurate spacing of floor joists when framing a house.
What are the red numbers on a tape measure?
Tape measures have red numbers that are spaced every 16 inches apart. This is to help construction workers find the correct spacing for studs placement quickly. When hooking the tape on the end of a board, they can quickly mark where the 16 inch marks are by looking at the red numbers. These marks are called “sixteen on center” marks.
What is the Easiest Tape Measure to Read?
The easiest tape measure to read would be one with a digital readout. Lexivon makes one with not only a digital readout, but also a laser measure option as well. It will shoot a laser at the object you want to measure, and tell you the distance to that object. The extendable tape has all the necessary markings and measurements if you still need to take a measurement the old fashioned way.
Conclusion
As you see, learning how to read a tape measure is easy to learn. It’s really as simple as holding the hook end on one side of what you are measuring, and extending the tape to the other end. Read the nearest foot mark that is inside the two edges of what you are measuring. Then find the nearest inch, and finally the nearest fraction of an inch. These three measurements will tell you what the final distance is of what you are measuring.
Thank you for reading this blog article. Here at Castle Remodel I want to help you learn how to turn your home into your own sanctuary. Reading a tape measure is an important part of that.
Happy Remodeling,
Kevin

