
Adding a dimmer switch can improve the ambience in virtually any room in your home. Learning how to install a dimmer switch is simple and quite safe when done correctly. Knowing how easy it is to install a dimmer switch will build your diy skills, and help you personalize your home. Now let’s get started in learning what it takes to install a dimmer switch in your home.
When shopping for the right dimmer switch, you will need to know if the light you are connecting it to uses a single switch, or multiple switches. Lights that have multiple switches to turn them on and off are also called “three-way” switches. This is how you determine which option to purchase for your dimmer switch.
This article below covers how to install a single-pole switch. Installing a three way switch can be a little more complicated, but is somewhat straightforward. Follow the instructions that come with the switch you purchase.
Warning: Some switches also connect to the wiring in slightly different ways. That’s why it is best to read over the instructions before installing the one you have. It may hook up differently than the one I installed in this article, so make sure you have all the right information you need before going into this project.
Required Tools:
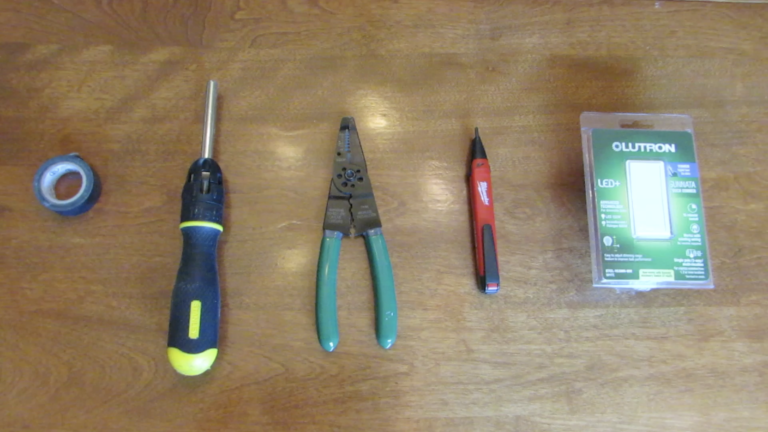
- Phillips screwdriver
- Flat screwdriver
- Non-contact voltage tester
- Wire stripper/pliers
Required Materials:
- Dimmer switch
- Face plate
- Wire nuts
- Electrical tape (optional)
Steps on How To Wire A Dimmer Switch
Step 1: Turn off the power to the light switch.
The most important step in this process is the first step. Make sure you turn off the power to the switch you are working on. To do this you will want to first turn the light on. Then locate the breaker that controls that light. After switching it off you can begin unscrewing the switch from the box it’s in.
Any time you are working with electricity it’s best to practice extra caution. Even after I turn off the power to the switch I am working on, I will use my electrical tester to make sure there are not any live wires in the box I am working in.
To do this, remove the screws holding the switch in the box. Gently pull it out of the box enough to see all the way around it. Turn on your electrical tester, and hold it to each of the wires in the box. If it indicates there is a live wire in the box, switch off the correct breaker for that wire as well.
Step 2: Remove the old switch.
There are two ways to do this. After you pull the switch out of the box, take a look at how much wire you have to work with. If the lengths are around 5-8 inches, you can get away with clipping them about half an inch from the screws they are attached to. Then strip the first ¾ inch of plastic cover, exposing the bare wire. Then curl the ends with the pliers in a clockwise direction.
But if they are shorter like 1-3 inches you may want to go with the second option. First take pictures of how the wires are connected to the switch to use for later reference. Then unscrew the screws on the side of the switch that are holding the wires it is connected to. You will also want to straighten out the ends of the wires to get them ready for the next step.
The benefits of the first option is you will be able to check your work by seeing how the old switch was connected compared to how you connect the new one. You also will have straight ends to work with.
Step 3: Connect the new switch.
If you are installing a single pole switch, connecting the wires is pretty straight forward. Connect like colors to like colors.
Hold the ends of the two wires you want to connect, pointed in the same direction. Twist the ends clockwise three or four times. Then put the wire nut on the wires and twist in the same direction until it feels tight.
I like taking the extra step of applying a piece of electric tape on the two wires for a bit of extra security. By wrapping the tape on both wires as well as around the wire nut, you are keeping them locked in place so they don’t come loose when you are pushing the wires back in the box.
Step 4: Install the switch in the electrical box.
Use the machine screws that come with the switch to attach it to the electrical box. Take care in putting all the wires back in the box while you are screwing it in. You don’t want any of the wires poking out, and it can be a tight fit.
Make sure the screws are not going in at an angle. You want them to be lined up correctly so nothing gets stripped. This can be a much bigger problem that can be avoided.
Step 5: Turn the power back on.
Now is the moment of truth. Flip the same switch you turned off earlier. This will send power back to the light you were working on.
After you turn on the power you will be able to check your work. The first sign of something being wrong is the breaker will turn off automatically after you flip it on. If this is the case you need to keep it off and evaluate your connections to the switch.
If you followed the steps that were listed above, and connected the wires to the same locations on the new switch as the previous one, everything should be fine. The light switch will be working as intended.
Frequently Asked Questions
Is it safe to install a dimmer switch yourself? The answer to this question depends on your comfort level. If you have little to no experience working with electrical in the home, it is better you leave it to a professional.
If you take the right precautions, and have the correct tools, it’s safe installing a dimmer switch yourself. Just make sure you don’t cut any corners, and consult a professional if you have any questions.
Can you add a dimmer to any light fixture?A dimmer switch can be added to any light fixture that has an existing light switch attached to it. Think of it as a dimmer switch being the same as a light switch, but with the added option of dimming the light once it’s on.
Can a dimmer switch be used on a ceiling fan? It is not recommended to add a dimmer switch on a ceiling fan. If you are looking to control the speed of the ceiling fan it is best to get a fan with speed control built into it. There are many options for fans with this feature. My favorites are the ones that come with a remote control.
Installing a single pole dimmer switch is easy when you have all the right tools and knowledge to work with. I hope this article helped you out with this project.
If you have any questions or comments please drop them below. Thank you for visiting the Castle Remodel blog. This is where you want to go to help turn your home into your personal sanctuary.
Happy Remodeling,
Kevin